
Recently, I installed KVM on the latest Ubuntu 18.04 to virtualize a small VM cluster. Here, I document the main process and some issues encountered.
Preparation
First, you need to check if the CPU supports virtualization. Run the following command to check if there are any virtualization-related terms in the /proc/cpuinfo file. If present, it indicates that the CPU supports virtualization technology.
egrep -c '(svm|vmx)' /proc/cpuinfo
If the command returns 0, it means the CPU does not support virtualization technology. Additionally, virtualization technology in the motherboard BIOS might not be enabled by default. If not, you need to enable it manually.
Installing KVM
Run the following commands to install KVM:
sudo apt update
sudo apt install qemu qemu-kvm libvirt-bin bridge-utils virt-manager
Add libvirtd to startup:
sudo systemctl start libvirtd.service
sudo systemctl enable libvirtd.service
Network Modes
After installing KVM, you need to configure the network. KVM supports four network modes:
- Bridge mode
- NAT mode
- User network mode
- Direct device assignment mode
Let’s focus on the first two.
Bridge Mode
In bridge mode, the host and the virtual machine share the same physical network device. The network card in the virtual machine is parallel to the network card in the physical machine, allowing the virtual machine to directly access the external network with an equal IP level as the host.
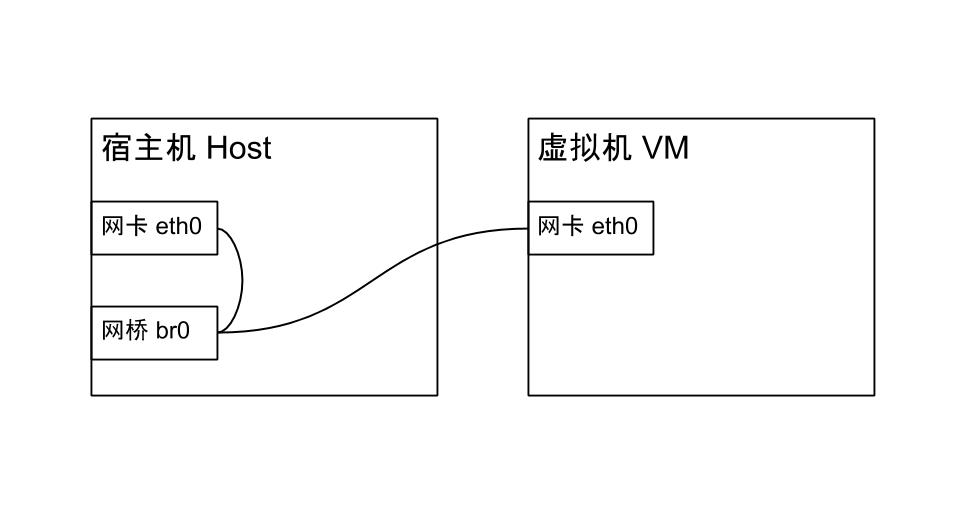
Originally, the host connects to the external network through the network card eth0. In bridge mode, a new bridge br0 is created to take over eth0 for connecting to the external network, and both the host and the virtual machine’s network cards are bound to the bridge.
To use bridge mode, perform the following steps:
Edit /etc/network/interfaces and add the following content:
auto br0
iface br0 inet dhcp  # The bridge uses DHCP mode to obtain an IP from the DHCP server
bridge_ports enp3s0  # Network card name, the card connected to the external network before the bridge is created, can be checked with ifconfig, the one with an IP address
bridge_stp on  # Avoid data link loops
bridge_fd 0  # Set forwarding delay to 0
Next, restart the networking service (if connected to the host via SSH, this step will cause a network interruption. If issues arise, it may lead to losing connection to the host, so it’s best to operate directly on the host):
systemctl restart networking.service
Use the ifconfig command to check if the IP has moved from enp3s0 (the network card before the bridge was created) to br0. If not, a restart may be needed. If the host IP has successfully moved to the bridge and the host can access the internet but the virtual machine cannot obtain an IP, it might be due to ufw not allowing IP forwarding. Edit /etc/default/ufw to allow IP forwarding:
DEFAULT_FORWARD_POLICY="ACCEPT"
Restart the ufw service to apply the settings:
systemctl restart ufw.service
NAT (Network Address Translation) Mode
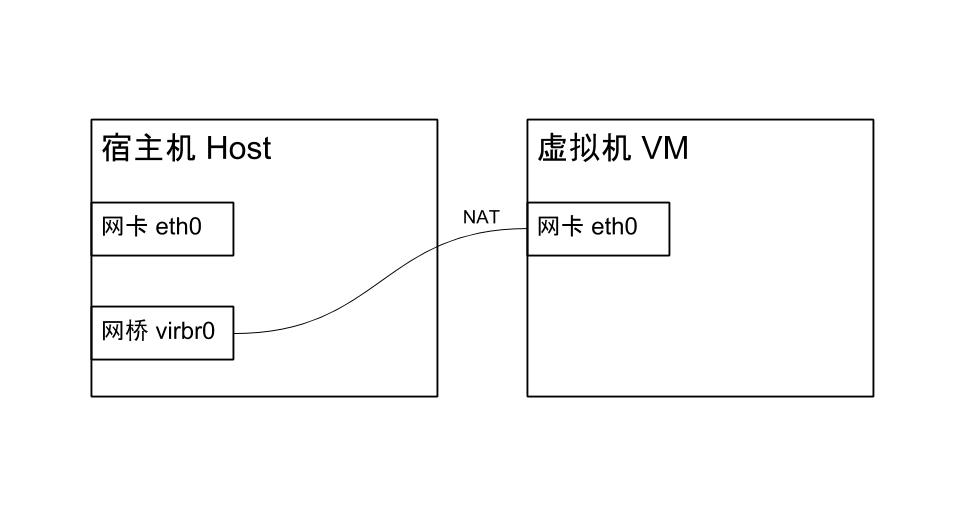
NAT mode is the default network mode for KVM. KVM creates a virtual bridge named virbr0, but the host and the virtual machine are not equal to the bridge. The bridge hides the virtual machine, assigning it an internal IP, making it inaccessible from the external network.
Installing a Linux Virtual Machine
Use the following command to install a Linux virtual machine:
sudo virt-install -n ubuntu_3
 --description "ubuntu_3"
 --os-type=linux --os-variant=ubuntu17.10 --ram=1024 --vcpus=1
 --disk path=/var/lib/libvirt/images/ubuntu_3.img,bus=virtio,size=50  # Disk location, size 50G
 --network bridge:br0  # Network is set to bridge mode
 --accelerate
 --graphics vnc,listen=0.0.0.0,keymap=en-us  # VNC listening port, ensure to choose en-us as key-map to avoid key layout issues
 --cdrom /home/zzy/Downloads/ubuntu-18.04-live-server-amd64.iso  # Path to installation ISO
Installing a Windows 10 Virtual Machine
When installing a Windows 10 virtual machine, you may encounter an issue with missing virtio drivers, causing the installation program to not find the hard drive. You need to download the virtio drivers first.
https://fedoraproject.org/wiki/Windows_Virtio_Drivers
Add them to the CD-ROM when creating the virtual machine:
sudo virt-install -n win10
 --description "win10"
 --os-type=win --os-variant=win10
 --ram=4096 --vcpus=2
 --disk path=/var/lib/libvirt/images/win_10.img,bus=virtio,size=100
 --network bridge:br0
 --accelerate
 --graphics vnc,listen=0.0.0.0,keymap=en-us
 --cdrom=/home/zzy/Downloads/cn_windows_10_consumer_editions_version_1803_updated_march_2018_x64_dvd_12063766.iso
--cdrom=/home/zzy/Downloads/virtio-win.iso
Connecting to the Virtual Machine Using a VNC Client
Execute the following command to view the list of virtual machines:
sudo virsh list
From the list obtained in the previous step, check the VNC port of a single machine:
sudo virsh vncdisplay ubuntu_3 # ubuntu_3 is the name of the virtual machine
Once you know the VNC port number, you can use a VNC client to connect to the virtual machine and complete the installation.